To install an LED load resistor, connect it to the vehicle’s turn signal wire and a solid grounding point. Ensure the resistor’s wattage matches your LED’s requirements for optimal performance.
Upgrading to LED turn signals often leads to hyper-flashing, a rapid blinking of the turn signal, which can be frustrating for any vehicle enthusiast. Installing an LED load resistor is the go-to solution for correcting this problem. This simple yet effective modification enables the vehicle’s electrical system to recognize the energy-efficient LEDs, ensuring they work at the intended blink rate.
It’s important to select the right resistor for the specific LED bulb used to prevent any electrical issues. The installation process, which involves splicing wires and securing the resistor, is straightforward, with the resistor acting as a bridge in the electrical system. Ensuring secure connections and proper placement is vital for safety and functionality. This basic step helps maintain the reliability of your turn signals while enjoying the benefits of LED lighting.

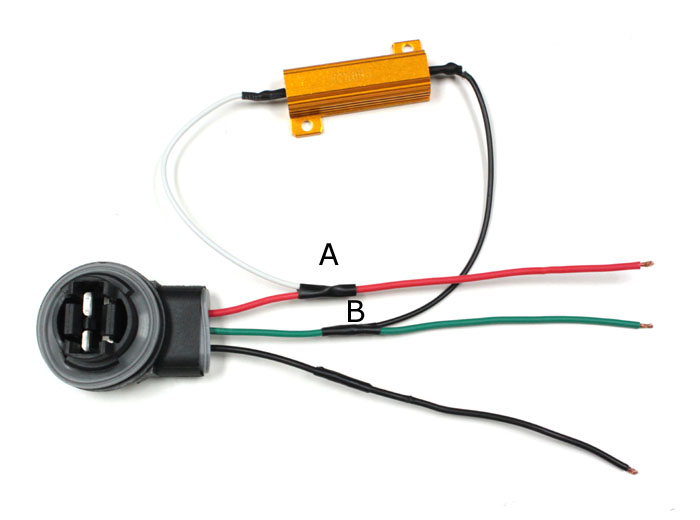
Credit: www.instructables.com
Introduction To Led Load Resistors
LED load resistors are essential for proper LED operation in vehicles. Traditional bulbs draw more power than LEDs. This causes the vehicle’s system to think a bulb is out. Load resistors mimic the power draw of standard bulbs. Thus, they prevent false warning signals and flickering lights.
Electrical resistance is key to how these resistors work. A resistor limits the amount of current reaching the LED. The right amount of resistance makes the LED function like a standard bulb. With correct installation, your LED lights will work smoothly.
Swapping standard bulbs for LEDs might bring issues. The car system can show errors or cause rapid blinking. These problems happen because the new LED bulbs draw less power. Using a load resistor fixes these concerns, ensuring the lights work as intended.
Choosing The Right Led Load Resistor
Determining the proper resistance value is crucial for LED load resistor installation. Vehicle indicators often face hyperflashing due to LED upgrades. Resistance value stops the hyperflashing. Use the vehicle’s wattage and the LED’s wattage to calculate it.
Types of LED load resistors vary. Some are ceramic, others aluminum. Ceramic resistors are smaller, but may not dissipate heat as well. Aluminum resistors, usually larger, handle heat better. Choice depends on the installation space and heat tolerance.
Compatibility concerns with specific vehicle models? Always check the manufacturer’s instructions. Some vehicles have special requirements due to their unique electrical systems. Consulting a professional is advisable for those unfamiliar with electrical work or specific vehicle models.
Step-by-step Installation Guide
Before diving into installation, collect all necessary tools. Safety should be your top priority. Equip yourself with protective gloves and glasses. Make sure the vehicle is off and keys are removed. For the task, ready a wire stripper, solder gun, and heat-shrink tubing.
Locating the right wiring is critical. Always refer to your vehicle’s manual. It will guide you to find the blinker wires. These wires connect directly to your LED load resistors. Typically, look for a positive wire and a ground wire.
Installing the resistor demands attention. First, turn off the car and lights. Strip the blinker wires and twist each end to the resistor leads. Solder joints to ensure a secure connection. Insulate with heat-shrink tubing. Fasten the resistor away from plastic or wiring to prevent damage from heat.
After installing, testing is a must. Turn on the vehicle and check your signals. If LEDs flicker or don’t work, recheck all connections. Ensure the resistor is properly mounted and the wires securely soldered. If issues persist, consult a professional or reference specific guides for your vehicle model.

Credit: store.ijdmtoy.com
Maintenance And Long-term Considerations
Maintenance of LED load resistors is key for optimal performance. Monitoring the temperature is essential, as high heat can lead to failure. Ensure the resistor is mounted on a heat-resistant surface. This can prevent potential damage.
Safety should always be a priority. It’s crucial to check for signs of wear and tear. Heat-resistant gloves are recommended during inspections. This is to prevent burns from hot resistors.
LED load resistors may need replacement over time. Look out for dimming or flickering lights, as these could be signs. Timely replacement helps maintain light system efficiency.
To ensure longevity of your LED systems, steady voltage is important. Use only quality load resistors and follow installation instructions. Regular checks and immediate action on issues will help keep your LEDs shining bright.

Credit: m.youtube.com
Frequently Asked Questions For How To Install Led Load Resistor
How Do You Connect A Led Load Resistor?
Begin by powering off your vehicle or circuit. Connect one end of the load resistor to the ground wire, and attach the other end to the positive LED wire. Ensure the resistor’s body doesn’t touch any metal surfaces to prevent short circuits.
Secure the connections with appropriate electrical tape.
Where Do You Put A Resistor In A Led?
Place a resistor in series with the LED to ensure proper current flow. Connect it to either the anode or cathode lead of the LED.
Do I Need A Load Resistor For Led Lights?
Yes, a load resistor may be necessary for LED lights to mimic the electrical load of traditional bulbs and prevent hyper flashing in turn signals.
How Do You Connect A Resistor To A Led Turn Signal?
To connect a resistor to an LED turn signal, first identify the positive lead of the LED. Solder one end of the resistor to this lead. Then, attach the other end of the resistor to the positive wire of the signal circuit.
Ensure all connections are secure and insulated.
Conclusion
Installing an LED load resistor need not be daunting. By following the step-by-step guide above, the task is simplified and the likelihood of errors is minimized. A stable and correctly functioning electrical system in your vehicle is just a few connections away.
Remember to always prioritize safety and consult a professional if in doubt. Happy tinkering!


