If your Harley running lights are not working, first check the fuse, then the bulbs and wiring. A malfunction in any of these components can cause lighting issues.
Maintaining operational running lights on your Harley-Davidson motorcycle is not only crucial for road safety but also a legal requirement in many areas. Riders often encounter challenges such as electrical faults or blown fuses that result in non-functioning running lights.
To troubleshoot, start by inspecting the simplest elements: ensure the lights are not burnt out and the fuse linked to the running lights has not blown. Faulty wiring or a malfunctioning switch can also be culprits, often requiring a more in-depth examination. Regular maintenance and prompt attention to any anomalies in your motorcycle’s lighting system can prevent potential hazards on the road, ensuring a safer ride for you and visibility to others.
Introduction To Harley Running Lights
Harley-Davidson running lights serve as a critical feature for motorcycle enthusiasts. Essential for safety, these lights ensure that other motorists can easily spot the bike, significantly reducing the risk of accidents during both day and night. Without proper running lights, a motorcycle becomes less visible, making it challenging for drivers to acknowledge its presence on the road.
These lights also enhance the aesthetics of the motorcycle, giving it a distinctive appearance.
| Feature | Function |
|---|---|
| Safety | Increases rider visibility |
| Visibility | Allows for earlier detection by others |
| Style | Enhances motorcycle’s look |

Credit: www.hdforums.com
Troubleshooting Common Issues With Harley Running Lights
Harley running lights may not work for various reasons. A step-by-step guide helps find the issue. First, check electrical connections and wiring. Loose connections often cause light failures. Look for damaged wires too.
Test the bulbs by swapping them with known good ones. If they light up, replace the faulty bulbs. Fuse inspection is crucial. A blown fuse will stop lights from working. Find the fuse box and check the related running light fuse. Replace if necessary.
Finally, inspect the light switch and handlebar controls. Corrosion or wear can lead to failure. Clean the contacts or replace the controls if needed. Following these steps should restore Harley running lights effectively.
Advanced Diagnostic Techniques
Detecting faults in Harley running lights often requires a multimeter. Use this tool to check for voltage and continuity. Split the diagnosis into smaller, easier steps. First, ensure the multimeter is set correctly. Next, test each light’s connection point. A steady reading means good electrical flow.
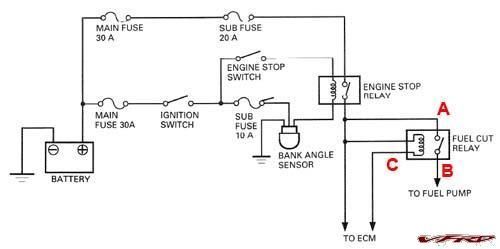
Understanding wiring diagrams is essential. Diagrams show where wires go and what they do. This insight is key for pinpointing issues. Grab the Harley’s manual. Look for the lights’ wiring schematic. Follow each line. It tells you which wires feed the running lights.
Harley’s CAN Bus system might sound complex. It’s a network that helps various parts talk to each other. Problems with the CAN Bus can cause light failures. The system requires precise diagnosis.
Sometimes, it’s best to call a trained technician. They understand complex electrical systems. If the lights still don’t work after your checks, don’t hesitate. Find a skilled mechanic. They have the right tools to fix the problem fast.

Credit: www.amazon.com
Maintenance Tips To Prevent Future Running Lights Issues
Maintaining your Harley’s running lights is vital for safety. Dirt and grime can cause malfunctions. Clean them regularly to ensure they shine brightly.
LED lights offer longer life and better performance than traditional bulbs. Consider upgrading to reduce the chances of future issues. LED upgrades lead to fewer running light failures.
Running light problems may signal deeper electrical issues. A professional check-up twice a year is smart. It helps catch and fix problems early. Harley enthusiasts should be aware of model-specific issues. Know your bike’s common electrical quirks for early detection.
Concluding Thoughts On Keeping Harley Running Lights Functional
Ensuring your Harley’s running lights work is critical for safety. Regular checks help spot issues early. Simple troubleshooting includes checking fuses and bulbs. Don’t forget to inspect wiring connections. Clean contacts can prevent light malfunctions. Consider scheduled maintenance to avert electrical problems. Remember, well-functioning lights mean better visibility on the road.

Credit: www.rogueriderindustries.com
Frequently Asked Questions On Harley Running Lights Not Working
Why Did My Running Lights Stop Working?
Your running lights may have stopped working due to a blown fuse, faulty wiring, a bad relay, a malfunctioning switch, or burnt-out bulbs. Check these components to diagnose the issue.
Why Are My Running Lights Not Working On My Motorcycle?
Your motorcycle’s running lights might not work due to a blown fuse, burned-out bulbs, faulty wiring, or a malfunctioning light switch. Check these components to identify the issue.
Why Are My Tail Lights Not Working But My Headlights Are?
Tail lights may not work due to a blown fuse, faulty wiring, or burned-out bulbs. Check these components to diagnose the issue.
Where Is The Drl Fuse?
The DRL fuse is typically located in the vehicle’s fuse box under the hood or within the cabin. Check the owner’s manual for the exact location in your specific vehicle model.
Conclusion
Troubleshooting Harley running lights can seem daunting, but knowing where to start simplifies the process. Regular maintenance and prompt attention to issues prevent long-term damage. Remember, safety and visibility are paramount on the road. Keep your ride illuminated, and enjoy the journey ahead with confidence and peace of mind.
Safe travels!
